Knowing how to effectively transfer your Python code from
your laptop, aka dev environment, to
the remote compute environment your company uses (AWS Lambda, AWS ECS, Cloud Functions, Kubernetes…), aka production environment
is one of the most useful skills you can master as an ML engineer.
And this is because ML and LLM engineering in the real world is
90% engineering, focused on building a robust workflow for developing, testing, deploying and monitoring your Python apps (e.g. a fine-tuning script, a vLLM server…)
10% science. Yes, Kaggle notebooks are great for research, but that represents a very tiny portion of the work (and time) you need to spend in a real world ML project.
If you learn the science, and master the engineering, the world is yours.
So today, I want to show you the basic steps to bring a Python app from your local computer into a Kubernetes cluster.
What is Kubernetes?
Kubernetes is the industry standard container orchestration platform that helps you deploy, scale and manage your
jobs → like a training pipeline that refreshes the ML model of yours system, or a fine-tuning scripts that outputs a highly specialised LLM.
services → like an inference pipeline, that serves fresh predictions using a FastAPI, or a vLLM server for your LLM apps.
Image taken from https://kubernetes.io/docs/concepts/architecture/
Think of Kubernetes as an autopilot system for running your applications. You set the destination and rules, and it handles all the complex details of getting there and staying there.
You just tell Kubernetes what you want
"I need my application to always have three copies running", or "I need this much computing power" …
and Kubernetes makes it happen.
Let me show you how to deploy your first app to Kubernetes, step by step
You can fin all the code in this Github repository ↓↓↓
Step 2 > Create a local Kubernetes cluster with kind
We will use kind to create a local Kubernetes cluster. It will be a simple cluster that will run entirely on your machine, using as Kubernetes nodes simple Docker containers.
A local cluster like the one we are creating here is useful for development and CI pipelines, where you need a minimal cluster to run integration tests for your applications.
What about production-ready clusters?
Production clusters typically consist of multiple nodes, running in a cloud provider, or a private data center.
Production cluster creation, configuration, and maintenance is something you won't be doing in your day to day as ML Engineer. This is something that you either:
pay your cloud provider to do it for you, like when you use AWS EKS, Google GKE, Azure AKS, etc or
hire a top-notch engineer like Marius 👨🏻💻 to do it for you, so you get a solution that is cost-effective and scalable.
We will create a cluster consisting of
1 control plane node -> where the core Kubernetes components run
2 worker nodes -> where the apps we will deploy will run.
The configuration file for the cluster is the following:
Set the kubectl context to the cluster we just created, so you can interact with the cluster using kubectl:
kubectl config use-context kind-cluster-123
Get the list of nodes in the cluster:
kubectl get nodes

NAME                        STATUS   ROLES           AGE   VERSION
cluster-123-control-plane   Ready    control-plane   15m   v1.32.2
cluster-123-worker          Ready    <none>          14m   v1.32.2
cluster-123-worker2         Ready    <none>          14m   v1.32.2
Voila! You have a local Kubernetes cluster running on your machine.
Let's now move on to the ML engineering work.
Step 3 > Write the business logic of your app
In this case, we will create a simple FastAPI app that returns the current time when you hit the /health endpoint.
We will use uv to create the project, which is the most ergonomic way to create and package your Python code.
Create the boilerplate code with:
uv new simple-api
Add FastAPI to the project:
uv add fastapi[standard]
Rename the hello.py file to api.py and copy this code:
Congratulations! You have just built and run a Docker container locally.
Let's now take things to the next level and run it in a Kubernetes cluster.
Step 6 > Push the Docker image to the local Kubernetes cluster
Before we can deploy our app to the cluster, we need to push the Docker image to the image registry of the cluster.
To do that, we will use the kind CLI to load the image into the cluster.
kind load docker-image simple-api:v1.0.0
Step 7 > Deploy the app as a Kubernetes service
Now that we have the image in the cluster, we can deploy the app as a Kubernetes service.
We will need to create 2 resources:
a deployment.yaml -> which will define the pods that will run the app. In our case, we will have 3 replicas of the app.
a service.yaml -> which will define how to access the app from outside the cluster
Don't worry about the manifests for now. Kubernetes YAML files are notoriously verbose and hard to read. And if you are scared of them, you are not alone. I am scared of them too.
To deploy the app, we use the kubectl CLI to apply the Kubernetes manifests:
kubectl get pods

NAME                          READY   STATUS    RESTARTS   AGE
simple-api-7f4bbc478b-f7wdx   1/1     Running   0          5m26s
simple-api-7f4bbc478b-fjx2m   1/1     Running   0          5m26s
simple-api-7f4bbc478b-gfntx   1/1     Running   0          5m26s
Step 8 > Test it works
To test that the app is working, we can use the kubectl CLI to port-forward the service to our local machine:
kubectl port-forward svc/simple-api 5005:5000
Tip ⭐
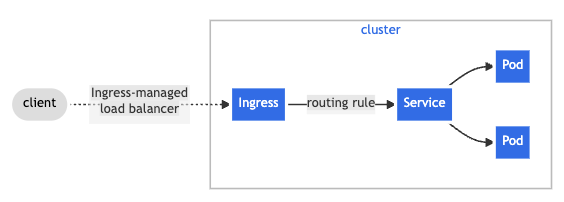
In a production Kubernetes cluster, you don’t do port-forwarding to expose your services to outside traffic. Instead, you define an ingress manifest like this
that uses an ingress controller (typically NGINX) to route external traffic to your services.
Ok.
Either with port-forwarding, or with an ingress resource and controller in place, you can now hit the /health endpoint at http://localhost:5005/health and get the current time.
If you want to run all previous steps quickly, use the Makefile I provided in the repo.
# Create the Kubernetes cluster
make cluster

# Deploy the FastAPI app to the cluster
make deploy

# Test connecting to the app
make test
CONGRATULATIONS! You have just deployed a FastAPI app to a local Kubernetes cluster.
The sky is the limit from here.
Wanna learn to build and deploy real-time ML systems to production?
In less than 10 days, 332 brave students and a guy called Pau will start building a production-ready real time ML system, in the 4th cohort of Building a Real Time ML System. Together.
It is a live course in which you and me design, build and deploy a Real Time ML System to predict short term crypto price movements.
It lasts 5 weeks, and it takes us more than 40 hours of live coding sessions to build it, using:
Universal MLOps design principles
Tons of Python tricks
Feature engineering in real time
LLMs engineer market signals from unstructured data
Some Rust magic
A Kubernetes production environment, that an infra guru like Marius has prepared.
I won’t lie to you. This is not a happy-path-toy-dataset-premade-Jupyter-carrousel-of-flawless-notebooks tutorial.
It is hard. It is Real World ML Engineering. it is FUN.
Gift 🎁
As a subscriber to the Real World ML Newsletter you can get lifetime access to all previous and future cohorts of the course with a 40% discount for the next 7 days.