Read on realworldml.net
This is Part 4 of this mini-series on how to solve real-world business problems using Machine Learning.
Remember 🙋
The 4 steps to building a real-world ML product are
Problem framing (3 weeks ago)
Data preparation (2 weeks ago)
Model training (last week)
MLOps (today) 🏋️
Let’s get to work!
Example
Imagine you work at a ride-sharing app company in NYC as an ML engineer. And you want to help the operations team allocate the fleet of drivers optimally each hour of the day. The end goal is to maximize revenue.
So far we have
framed the problem as a time-series prediction problem
prepared the data, and
trained a Machine Learning model in a Jupyter notebook that predicts next-hour taxi demand.
It is now time to put this model to work and produce actual business value.
Step 4. MLOps
The starting point is this one Jupyter notebook where you:
Loaded data from a CSV file
Engineered features and targets
Trained and validated an ML model.
Let's now turn this notebook into a batch-prediction service using MLOps best practices.
The 3-pipeline architecture
A batch-prediction service ingests raw data and outputs model predictions on a schedule (e.g. every 1 hour).
You can build one using this 3-pipeline architecture:
Feature pipeline 📘
Training pipeline 📙
Batch inference pipeline 📒
1. Feature pipeline
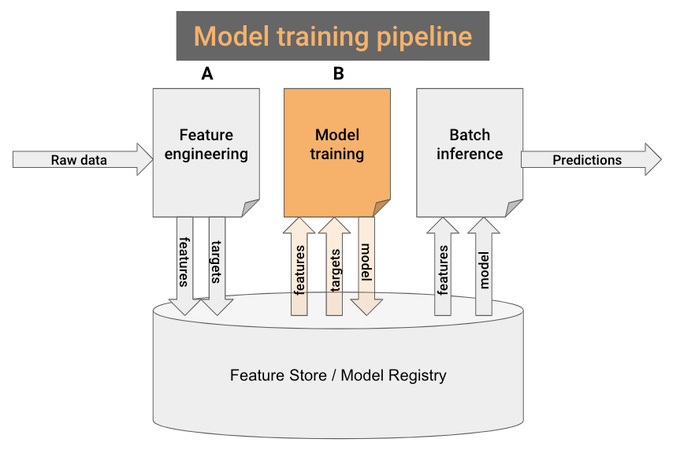
Break your initial all-in-one notebook into 2 smaller ones:
📘 Notebook A, reads raw data and generates features and targets.
📙 Notebook B, takes in the features and targets and outputs a trained model.
Notebook A is your feature pipeline. Let's put it now to work.
You need 2 things:
Automation. You want the feature pipeline to run every hour. You can do this with a GitHub action.
Persistence. You need a place to store the features generated by the script. For that, use a managed Feature Store.
2. Model training pipeline
Remember the 2 sub-notebooks (📘 A and 📙 B) you created in step #1?
Notebook B 📙 is your model training pipeline.
Well, almost. You only need to change 2 things...
Read the features from the Feature Store, and not CSV files.
Save the trained model (e.g. pickle) in the model registry, not locally on disk, so the batch-inference pipeline can later use it to generate predictions.
3. Inference pipeline
Build a new notebook that:
Loads the model from the model registry
Loads the most recent feature batch.
Generates model predictions and saves them somewhere (e.g. S3, database...) where downstream services can use them.
Finally, you create another GitHub action to run the batch-inference pipeline on a schedule.
Boom.
My advice 💡
In this 4-post miniseries, I showed you step-by-step how to travel the whole journey from a business problem, to a fully working ML product.
However, you won’t learn much unless you get your hands dirty and build one yourself.
Building ML products is hard, and requires effort, but the upside is immense.
Fail N times.
Learn N times.
Succeed on the (N+1)th attempt.
Wanna design, develop and deploy this ML system yourself?
Join the Real-World ML Tutorial + Community and get lifetime access to
→ 3 hours of video lectures 🎬
→ Full source code implementation 👨💻
→ Discord private community, to connect with 300+ students 👨👩👦
Looking forward to having you onboard!
Let’s keep on learning!
Peace, Love and Laugh
Pau


